Build complete

293I found time about a month ago to finish up my facet kite, just ahead of my family’s trip to the beach. Of course, the spars are too big for our suitcases, so it got left at home. Since then we haven’t had the free weekend to get it up in the sky.

As they say, until it flies, it’s just art. But here’s a picture of the final assembly anyway. To give a sense of scale, the kite is about 1.2 meters tall.

Edge binding

Edge binding by bluesterror I finished reinforcements on my facet kite about a month ago, and there my project sat as I waited for supplies to come in. Last Thursday the shipment arrived, so when I got a free hour this weekend, I did the edge binding on four of the eight panels. On all of my previous kites, I used double-folded hems, where, as the name suggests, you fold the edge of the sail over twice and then sew it flat. With edge binding, you instead fold and sew a separate piece of material along the cut edge. Edge binding seems like it would be easier, but I find that it’s a bit of a battle to keep the sail and binding material aligned. Perhaps some sticky tape would help, but that just adds to the build time. On the other hand, binding can look nicer since the border stands out.

After I finish the bindings, there’s a bit more sewing, and then it’s ready for framing and its first flight.

New kite

Star FacetIt’s almost spring and that means time to make another kite! I haven’t done one in a couple of years so hopefully I haven’t lost all of the necessary sewing skills. This time around I’m going with a cellular design (think box kite), the #54 star facet. This morning I spent about half an hour on the first step — cutting out the necessary shapes from rolls of ripstop nylon. We have an enclosed area with great big sunny windows in our apartment which are perfect for tracing the shapes out onto the material.

The next step is adding reinforcements and binding for which I’m waiting on supplies. The Cherry Blossom nee Smithsonian Kite Festival is coming up in a couple of weeks so I want to get it all done by then. I can’t wait to see what Alex thinks of kite flying!

Spiderman kite

Batman, Meet SpidermanI finished up the bridle and spars for the Batman kite and moved on to the second featuring a Spiderman logo (actually, the black Spiderman logo, but who’s counting). Until now, I have done all of my appliqué using a technique known as reverse appliqué. With this technique, I would create a stack of all of the layers of ripstop nylon that will be visible, usually with the lightest colors on the bottom. Then, I’d draw the design on the top layer in washable pencil, sew along those lines, then cut layers off the top one at a time until the proper colors show through. This photo is partway through that process on the Snorlax rok.

For this logo, I decided that cutting out so many sharp corners would be difficult, and cutting appliqué is when I invariably punch a hole in the sail and have to reach for the superglue. So on this one I tried forward (normal) appliqué instead. First I cut out the entire spider then taped the legs down to a piece of cardboard. I sprayed the whole thing with spray glue, waited a minute for it to set, then carefully placed the sail on top of the spider. Then I flipped it over, repositioned the spider legs to get all the air bubbles out, and voilà — I had the logo nicely attached to the sail. The glue isn’t permanent though, so then I spent an hour or so sewing around the inside edges of the design. I expected to go outside the lines of a few of the stitches, but surprisingly I did it all without a hitch, so to speak.

Batman Eddy

Batman kiteI made my first kite in over a year this afternoon (yes, I am quite rusty). I plan to make a stack of these kites for my nephews with various super hero designs. This is the first and easiest one, which took about 4 hours of work today from start to finish. It isn’t perfect, the sides were a little uneven when I cut the sail which can be seen in the final product. Also I think appliqué really looks much better with the black outlines that I’ve used on my previous kites, but I really don’t have the time/patience to add another layer of ripstop to these just for that effect.

Still, these will be much better kites than you can find in your local store. At least I hope so; I haven’t made this type before — who knows if they will fly. However, I should find out soon since this one just needs a bridle and sticks and it’s good to go.

Readying for launch

To correct my earlier post, the kite festival is actually tomorrow, March 29, not March 28th. Our final count for # of kites between the two of us is 5. I couldn’t find a spar for #6. (Why do I have 6 kites?) Meanwhile, I still need to finish up my 10-kite rollup bag tonight.

On the programming front, I officially posted OMFS for kernel inclusion as I’m tired of having to make minor changes every time someone updates the VFS api. The #ifdef jungle was getting dense. So far the review hasn’t been overwhelmingly negative, so maybe this will encourage me to flesh out the remaining unimplemented features that the FUSE version has.

Panda Kite


Panda Kite Applique
Originally uploaded by bluesterror

Here’s my first kite since the Pokemon rok. The Smithsonian kite festival is on March 28 this year, and the theme is “China.” I tried, and more or less failed, to make a kite last year in time for the same event. But here we are a year on and I’ve learned a lot since then.

The hanzis supposedly say ‘China’ in simplified Chinese, but really I’m just guessing. I chose a “small” (3 feet by 4 feet) sail for this one because I wanted to be able to get it mostly done in a day, which I did. It still needs hemming and framing but otherwise it’s ready to go.

With a couple of store-bought kites and four homemade ones, my kite bag is going to be rather full this year, so take that as an invitation to head down to the Mall and fly one for me!

Pokemon Rokkaku

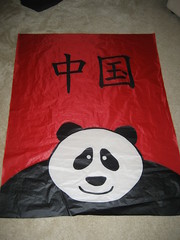
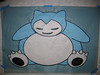
Anyone who has been looking at my flickr feed has seen that I’ve had another kite in the works for the last couple of months. I’ve had this particular one in mind for a while but didn’t quite have the sewing skills to pull it off until now. So, I present, the Snorlax rokkaku:
Part of a foot
Assembled drawing
Partial appliqué
Snorlax Applique
Ange and Kite
Snorlax in flight

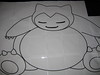
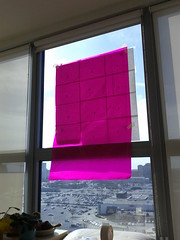
To build this, first, I stole a graphic off of Wikipedia and re-drew it in Inkscape, so that I’d have a vector version to work with. I saved an EPS version of the image then used the poster program in Linux to print it out, scaled way up, on regular letter size paper with cut and paste margins. After assembling all of the individual pieces of paper together into one huge image, I placed it on my glass coffee table, put black ripstop nylon on top, and a lamp under the table, so that I could then trace it with a white fabric pencil.

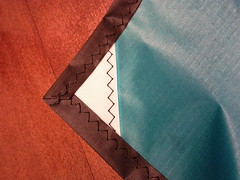
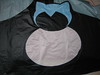
Next, I layered several large sheets of ripstop nylon: white on bottom, turquoise, gray, and the black which had the tracing of the design on top. I sewed zigzags along all of the lines, then cut out layers of ripstop from the front and back until the appropriate color was left. Finally, I added triangular panels of RSN for the top and bottom of the kite, hemmed the whole thing, and added spar pockets and reinforcements. I sparred it with carbon rods – SkyShark P400 center spar and a pair of P200s or P300s for the spreaders (I have both for varying wind conditions).

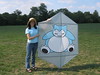
Now the rationale: I wanted to finish this one in time for our honeymoon, as Snorlax is something of a mascot for Angeline. At least, that’s what she got when she did the ‘which Pokemon are you?’ quiz (Keirsey has nothing on the internets). We don’t really know anything about the Snorlaxi but it seemed like the perfect cartoon to put on this rok, and now Angeline has her own kite to fly when I’m putting up my della porta in Hawaii!
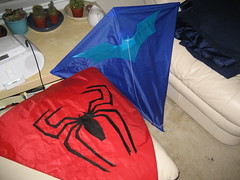
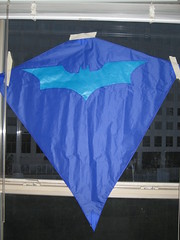
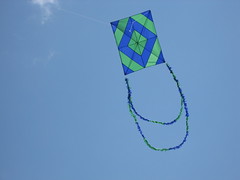
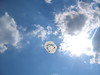
Gibson pocket sled


Gibson pocket sled
Originally uploaded by bluesterror

Continuing with the dumb projects, here is my latest kite, a pocket sled (so called because you can fold it up into your pocket) with a Gibson guitar logo appliquéd onto the front. Mostly I was just practicing some complicated sewing here rather than shooting for the end product, but it came out well enough. I might tackle a large kite bag next, and then perhaps the big rokkaku I have been planning for a while. Or maybe another practice kite.

Oh, I’m going to hotlanta this weekend to make up some BBQ with the relatives. I think this is my favorite new family tradition. Pork!

Della Porta in Flight


Della Porta in Flight
Originally uploaded by bluesterror.

AC and I went down to the Washington Monument grounds to try out the kite today, on a lovely sunny, breezy day. It took a few adjustments of the bridle to get the thing aloft, and the tail kept getting tangled up, but once I had it figured out it took up all of my line and was still pulling pretty hard. Quite a nice sense of accomplishment to see what began as a couple of rolls of nylon actually fly and not look half bad.