Lately I’ve been consumed with an urge to build things. Call it a manic phase. So last night I indulged, armed with my newest power tool: a Dremel. 35000 RPMs of pure madness. When I have it in my hands, you’d be well advised to stand back ten feet.
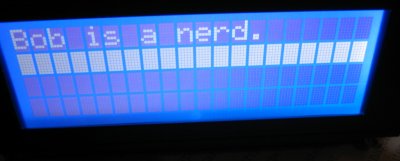
Okay, I know case modding is the geek equivalent of spoilers and ground effects. All the same, it is nice to add a little bit of personal touch, however slight, to one’s homegrown Tivo replacement. Since my newly-acquired LCD module didn’t fit in my case, I knew I’d have to do a little bit of surgery.
Obstacle number one is that the hard drives bump right up against the location where the LCD would have to go (there is already a display window that for some reason was placed there). I took the hard drive cage out, and moved the hard drives to the 5.25″ bays with mounting brackets. My ZIP drive occupying one of those spots got the boot. This was a bit of a tight fit because there are front panel USB and firewire connectors on the case that intrude into the bottom-most drive bay, but with some better cable routing and by mounting the harddrive a little high, I squeezed it all in there.
Obstacle number two is that the existing opening for the LCD is nowhere near big enough for this module. I had originally considered making a hole large enough for the entire PCB assembly and mounting the LCD from the front, but then I decided it would be sufficient to just widen the existing hole and mount the PCB assembly to the inside of the case. The latter scenario allows me to fall back to reinserting the hard drive cage if I ever decided that was needed, whereas the former would have me taking out the cage’s mounting screw terminals. So I put the metal cutter on the Dremel and cut out a larger square from the case. There’s something industrially visceral about the shower of sparks and taste of toxic paint accompanying this process. With a little fine tuning and some sanding of the edges, I had a perfect matched opening in the case for the LCD.
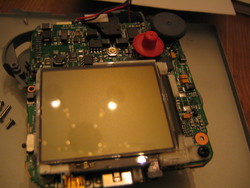
 In order to mount the module, I picked up a piece of perfboard from Radio Shack that I drilled appropriately to attach to existing screws on the PCB. Then I screwed the perfboard to existing mounting holes inside the case. The results? Quite nice. The window glass in the case, unfortunately, is tinted, making the LCD difficult to read at a distance, but it still looks good up close. Mythtv is already built to display the program information and progress as you watch TV, and menu items as you navigate with the remote. Probably not worth all the work and cost, but what else did I have to do?
More pictures in the gallery.
 Saturday, I deconstructed a broken CD-ROM to make a toy. This is essentially a so-called “
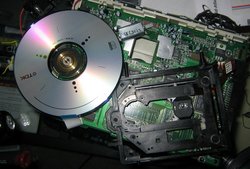
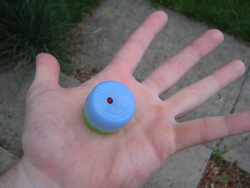 As a consumer of all types of liquids sold by heartless multinationals, I discovered this week that a plastic Evian bottle cap mates perfectly with a Coke bottle cap to make a little enclosure. It occurred to me immediately, nerd that I am, that this would make a good project box for any really small electronics project. Not having any such projects in mind, I decided I would make something simple and useless, and what’s more useless than a flashing LED?
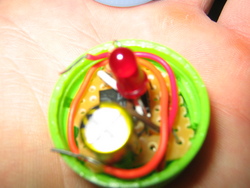 The circuit for a blinking light is pretty straightforward – it’s just a timer chip with an LED on the output. Except for the batteries (I used two 3V watch batteries taped together), I happened to have all the parts on hand: a 555 Timer chip (from a