So, wl12xx definitely works including transmission, but I still haven’t fixed the rough edges in the driver. However, I did bother to make a semi-permanent writeup on how to build and use wl12xx on the G1 as it currently stands. I hope to clean up the warts and submit the patchset next week. Meanwhile, I have a lot of ath5k bugs to work on. Enough for today though.
Unvacationed
Ange and I just returned from a long weekend in Florida with my family. After a perfect storm of flight delays and down computers, and US Airways personnel blaming the passengers over the intercom for ruining their holiday, we arrived in the state a mere six hours late. Everything from then on was smooth sailing though: sparkling sandy beaches, excellent weather, lots of playtime with the kids, and so on. My nephews’ superhero kites did in fact fly — after a trip to the local kite store to pick up some tails. We got in a full day of standing in line at Disney World, and an afternoon traipsing through ye olde shopping centre of St. Augustine. And I mostly didn’t touch the computer the whole time.
Anyway we are back and reinserted to the river of normal life. This trip should hold us until a month from now when we will be flying off to Berlin, Germany. I get two days of being nerdy at the Linux wireless mini-summit, and then the rest of it will be spent enjoying the city.
First scan
Success! Scanning with wl12xx on my ADP1 works. I’ll post more later but here’s a teaser. That’s a real SSID, however apt.
# ./iwlist wlan0 scan
wlan0     Scan completed :
          Cell 01 - Address: 00:0F:B5:63:30:4E
                    Channel:11
                    Frequency:2.462 GHz (Channel 11)
                    Quality=14/70  Signal level=-96 dBm
                    Encryption key:on
                    ESSID:"SERENDIPITY"
                    Bit Rates:1 Mb/s; 2 Mb/s; 5.5 Mb/s; 11 Mb/s; 18 Mb/s
                              24 Mb/s; 36 Mb/s; 54 Mb/s
                    Bit Rates:6 Mb/s; 9 Mb/s; 12 Mb/s; 48 Mb/s
                    Mode:Master
                    Extra:tsf=000001dec907e41c
                    Extra: Last beacon: 160ms ago
                    (Unknown Wireless Token 0x8C05)
wl12xx update
I won’t claim success until I actually transfer data, but so far, it looks like wl12xx SDIO support is baked:
[  111.247063] cfg80211: Using static regulatory domain info
[  111.253472] cfg80211: Regulatory domain: US
[  111.262810] 	(start_freq - end_freq @ bandwidth), (max_antenna_gain, max_eirp)
[  111.271568] 	(2402000 KHz - 2472000 KHz @ 40000 KHz), (600 mBi, 2700 mBm)
[  111.279472] 	(5170000 KHz - 5190000 KHz @ 40000 KHz), (600 mBi, 2300 mBm)
[  111.287254] 	(5190000 KHz - 5210000 KHz @ 40000 KHz), (600 mBi, 2300 mBm)
[  111.294975] 	(5210000 KHz - 5230000 KHz @ 40000 KHz), (600 mBi, 2300 mBm)
[  111.302482] 	(5230000 KHz - 5330000 KHz @ 40000 KHz), (600 mBi, 2300 mBm)
[  111.310264] 	(5735000 KHz - 5835000 KHz @ 40000 KHz), (600 mBi, 3000 mBm)
[  111.317894] cfg80211: Calling CRDA for country: US
[  112.684807] lib80211: common routines for IEEE802.11 drivers
[  112.690972] lib80211_crypt: registered algorithm 'NULL'
[  112.744713] lib80211_crypt: registered algorithm 'TKIP'
[  112.787467] lib80211_crypt: registered algorithm 'WEP'
[  112.845267] lib80211_crypt: registered algorithm 'CCMP'
[  113.251671] wl12xx: registering driver
[  113.256462] wifi_probe
[  113.259208] trout_wifi_power: 1
[  113.569452] trout_wifi_reset: 0
[  113.623681] trout_wifi_set_carddetect: 1
[  113.628290] mmc0: card_present 1
[  113.631921] mmc0: Slot status change detected (0 -> 1)
[  113.653283] mmc0: Command timeout
[  113.664788] mmc0: card claims to support voltages below the defined range. These will be ignored.
[  113.678429] mmc0: SDIO card claims to support the incompletely defined 'low voltage range'. This will be ignored.
[  113.692773] mmc0: new SDIO card at address 0001
[  113.702813] wl12xx: in probe
[  113.728844] phy0: Selected rate control algorithm 'minstrel'
[  113.738915] wl12xx: loaded
[  113.743919] wl12xx: initialized
Unfortunately, I can’t really test it yet because the wpa_supplicant already on the phone doesn’t support -Dwext or -Dnl80211, and there are no wireless-tools. So I need to cross-compile those before attempting to associate. In the meantime, here’s a very rough patch that implements the goods from wireless-testing wl12xx. I need to work on read() and write() – right now they are a copy of what is in the google driver because it appears the host driver has issues with RW_EXTENDED. I don’t believe the readb/writeb fallbacks should be strictly necessary. Ditto with the platform code, that needs a slightly better solution.
On Annoying Startup Chimes
I like my MacBook well enough, but it certainly does have its share of issues. One such bile-inspiring misfeature is that it sees fit to loudly blare its “I’m a Mac!” chime every time you turn the thing on. According to those in the know, this is actually a feature to let you know the computer started properly. Hmm, I see a big Apple logo, screen is on, I think it’s started. So, Mr. Computer, how about making the big ugly noise when you know it isn’t working instead, and save us the ear strain the other 99.9% of the time? Did they really think no one would want to use the laptop in, say, a library, or a classroom?
The bonus of this brain-o is that older Macs gave you the ability to hold down the mute key while booting to temporarily turn off the sound, a useful feature abandoned for the Intel Macs. Also, plugging something into the headphone jack doesn’t work, because “the headphone jack isn’t available at boot time.” (Why? I can still see it there!) Apple actually recommends, and I’m not making this up, that you “fix” it by remembering to mute your audio every time you shut down your computer. Some people have even written little daemon programs for OSX to do that for you. Amazing.
Of course, the fanboys rationalize this crazy behavior in predictably nonsensical ways: “You should always use sleep instead of turning off your computer” or “I like the sound because it lets people know I’m using a Mac.”
As it happens, the boot noise volume is configured by an NVRAM variable, which seems to be synced with the volume control at shutdown time. Setting it to 0x80 turns off the boot chime. Why 0x80, I do not know, but I stole this very useful information from some mailing list post and can attest that it works.
Here’s how I think this variable was born in Cupertino:
    Engineer 1: This noise is driving me mad, can't we turn it off?
    Engineer 2: Sure, we'll just put a switch in NVRAM.  That way, only the
                users have to deal with it.
    Marketing: Some users, probably miserable Windows lovers all, are whining
               about our awesome boot noise feature.  What should we tell them?
    Engineer 2: Just tell them to mute the audio when they turn it off.
                Heh heh.
So, here are some solutions: you can use the nvram program in OSX as in my previous link. And I’m sure you could, with proper EFI support in Linux (CONFIG_EFI_VARS), do a similar thing from Linux. But I am presently missing the EFI kit and I hate booting OSX, so here’s my other, much more insane way of fixing this problem.
You need:
- a Mac with rEFIt already installed
- a USB key with a [V]FAT partition
Procedure:
- Plug in the USB drive and turn on the machine.
- At the rEFIt boot screen, cursor down to the EFI shell. This will start a shell in the firmware reminiscent of the heydey of MS-DOS 3.0, when edlin was king of the text editors.
- Type ‘help -b’ to get your bearings.
- Get the current audio level via:
Shell> dmpstore SystemAudioVolume - Now, figure out where your FAT partition got mounted. Useful commands include ‘map’ and ‘ls’ (mine was on fs3):
Shell> map -b

Shell> ls fs3:
- Use dmpstore to save the NVRAM variable to a file.
- Use the built-in hex editor to change the last byte from the value in step 4 to 0x80. Yes, rEFIt has a built-in hex editor!
- Now load the new value, check it, and reboot.
Shell> dmpstore SystemAudioVolume -s fs3:volume.txt
Shell> hexedit fs3:volume.txt
Shell> dmpstore SystemAudioVolume -l fs3:volume.txt

Shell> dmpstore SystemAudioVolume

Shell> reset
That’s it! It should be gone for good, until you somehow enable it again. When that happens, you can pop the key back in, and redo step 8 with the volume.txt file you remembered to not delete.
Hmm, on second thought, maybe it is easier to just use the sysfs files.
Spiderman kite
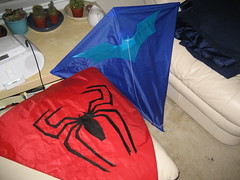 I finished up the bridle and spars for the Batman kite and moved on to the second featuring a Spiderman logo (actually, the black Spiderman logo, but who’s counting). Until now, I have done all of my appliqué using a technique known as reverse appliqué. With this technique, I would create a stack of all of the layers of ripstop nylon that will be visible, usually with the lightest colors on the bottom. Then, I’d draw the design on the top layer in washable pencil, sew along those lines, then cut layers off the top one at a time until the proper colors show through. This photo is partway through that process on the Snorlax rok.
For this logo, I decided that cutting out so many sharp corners would be difficult, and cutting appliqué is when I invariably punch a hole in the sail and have to reach for the superglue. So on this one I tried forward (normal) appliqué instead. First I cut out the entire spider then taped the legs down to a piece of cardboard. I sprayed the whole thing with spray glue, waited a minute for it to set, then carefully placed the sail on top of the spider. Then I flipped it over, repositioned the spider legs to get all the air bubbles out, and voilà — I had the logo nicely attached to the sail. The glue isn’t permanent though, so then I spent an hour or so sewing around the inside edges of the design. I expected to go outside the lines of a few of the stitches, but surprisingly I did it all without a hitch, so to speak.